When re-roofing, find the protruding adapter rim convenient for slicing or stab-breaking membrane and shingles to the duct circle. Never misalign a roof cap to the sheathing penetration.


 Prefer a plastic cap, and implore some changes to the Famco product. Introduce the adapter plate. Fix the injection mold to delete the stem option and to add wings at sides that better repel up-driven rain.
 Add the wings. Get rid of a twist in the cast base that defies screen installation.

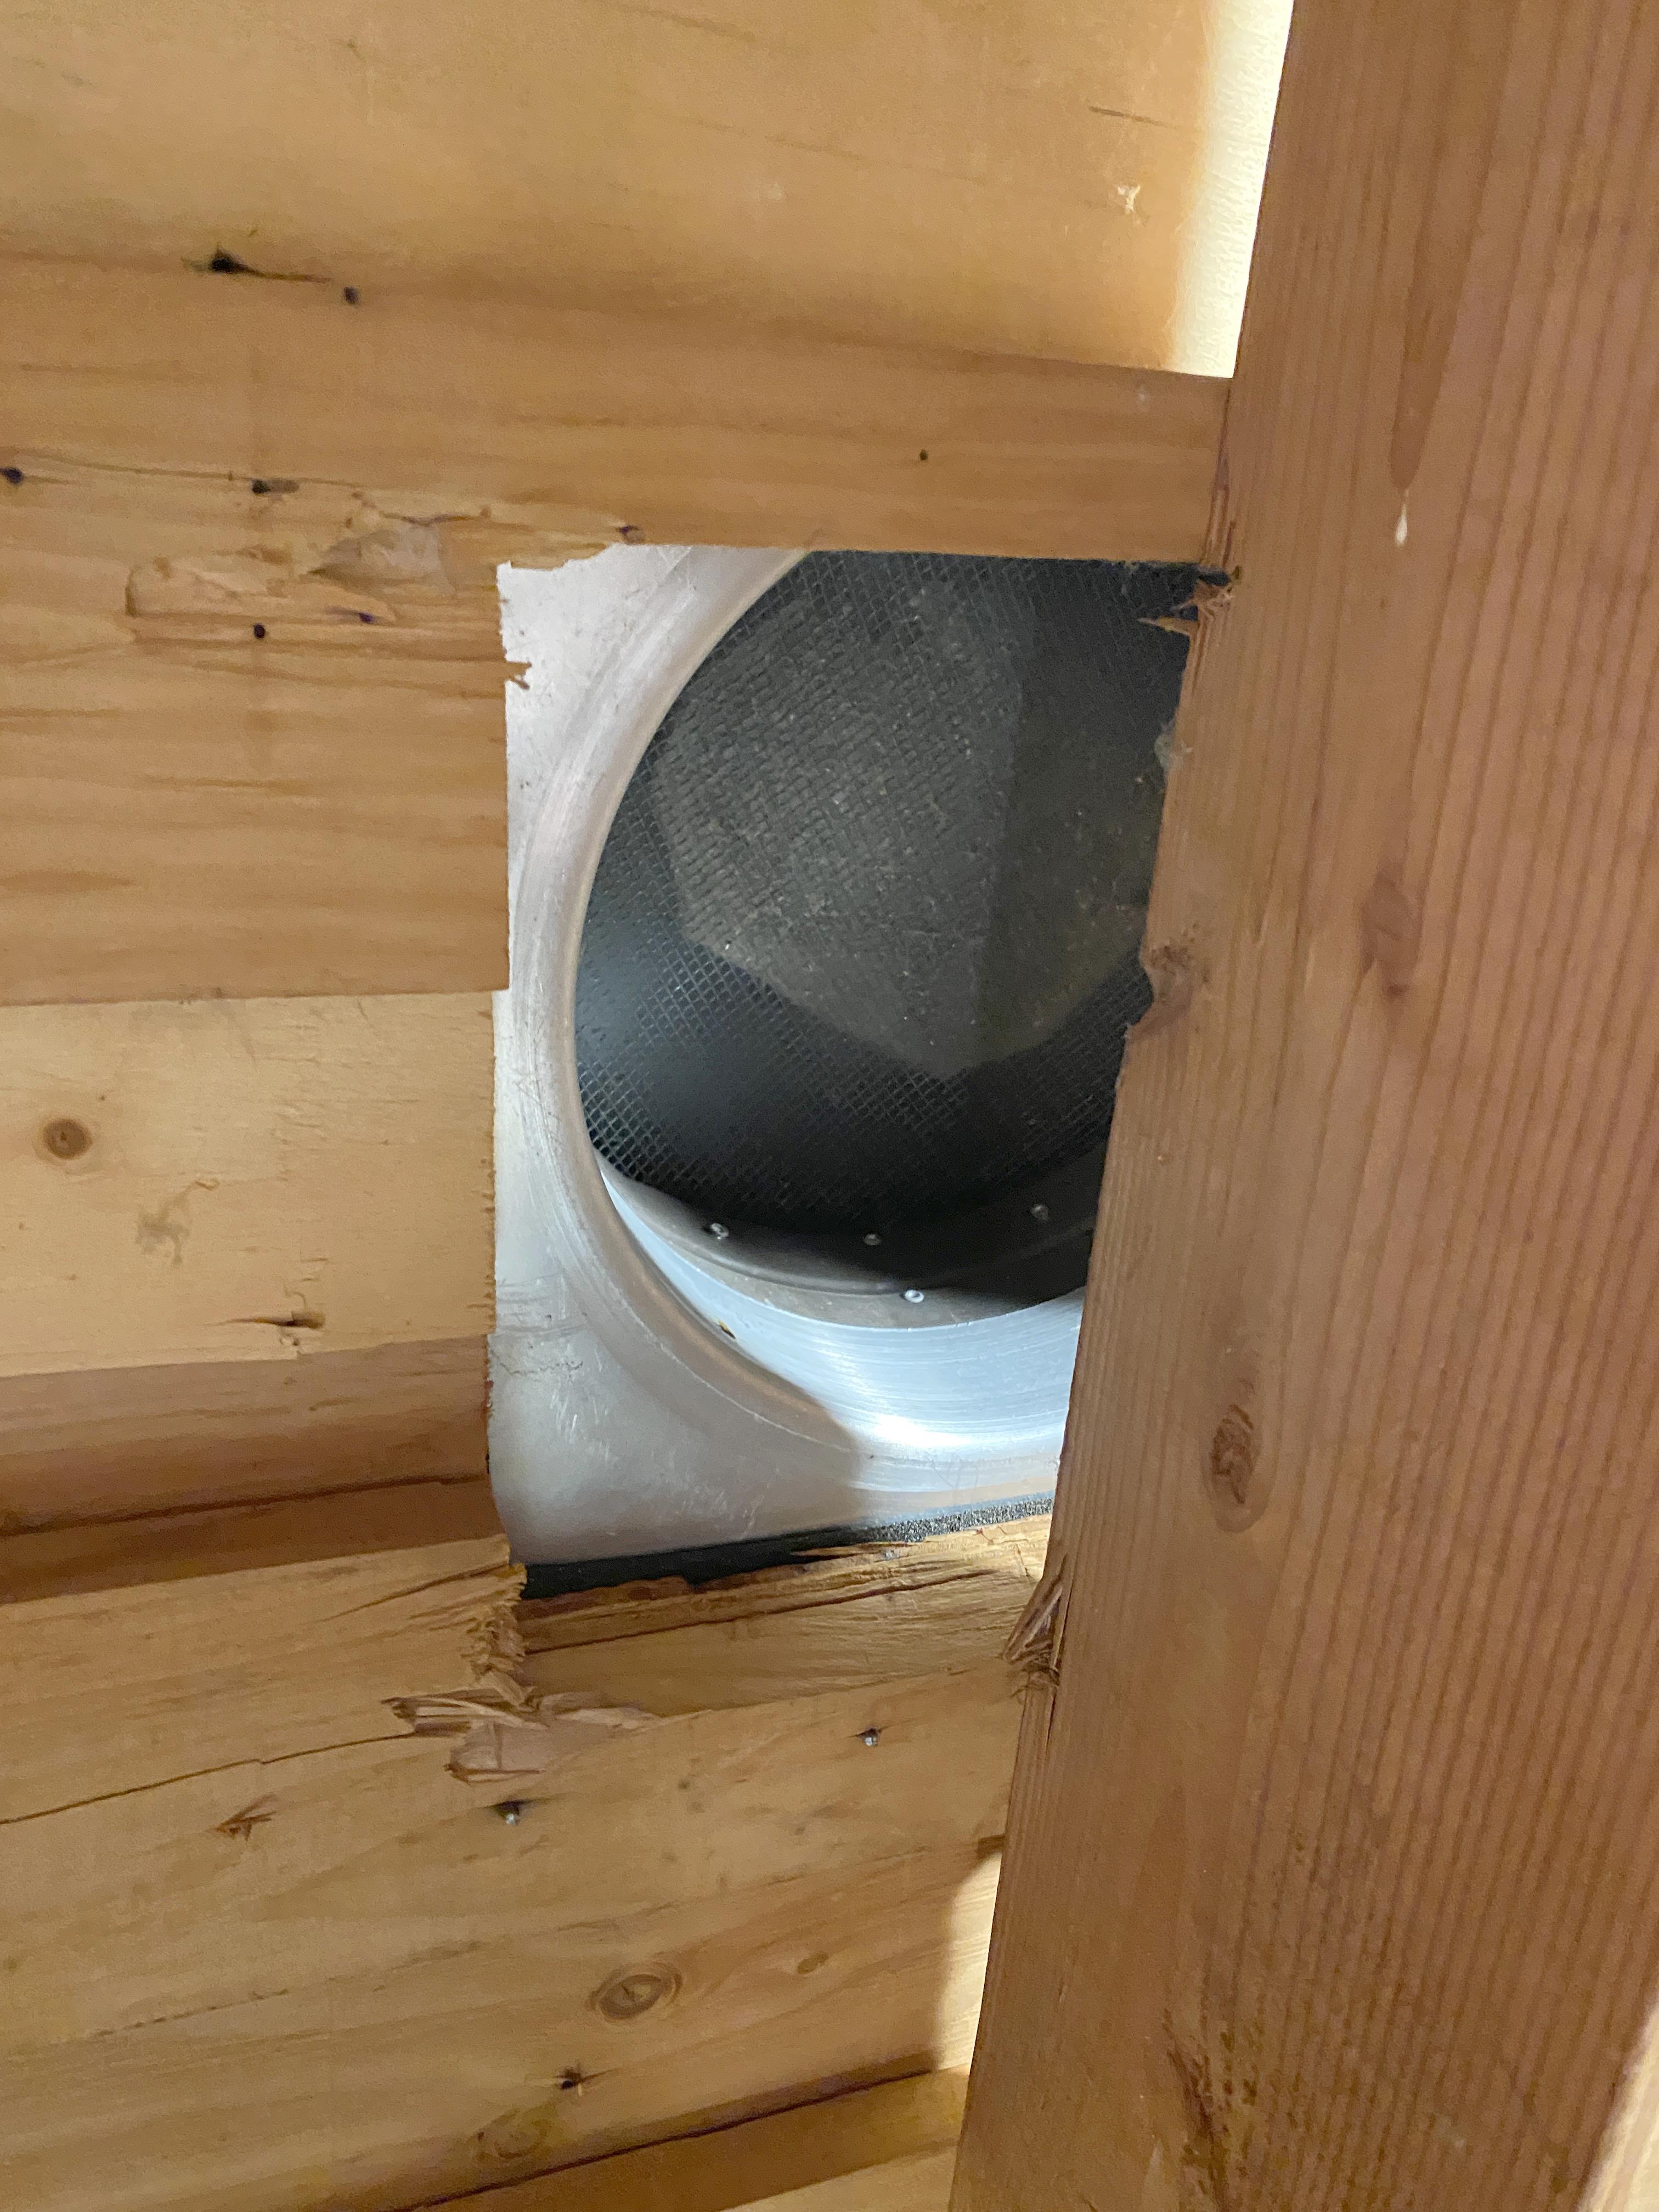
Here is an underside view of that cap, Norwesco RCV4 . One should wish for tolerance of some misalignment between the cap center and the smallest-possible roof cut, but an oversize square below a flapper-check here is not as helpful as size of the cap might permit. I suggest there should be about 2" diametral clearance between pipe and cap paths in which there is no performance penalty, in placing the cap to suit the shingle pattern.

Where the cap bore is about 3/4" above the roof bore in this installation, I think there is some added flow resistance.

Where Norwesco and Famco 4" and 6" plastic caps without stem are nearly identical and with a lot of misalignment potential, find argument that their flapper function should be transferred to a roof penetration assembly. Enlarge the crown and the opening of the base of their caps as in steel Broan 636 (up to 4" ducts) and 634 (up to 6" ducts), and their cheaper knock-offs at Home Depot. With this innovation, offer convenient duct joining means for the Broan steel caps. Get rid of jamming-prone rectangular flappers.
See here better trial placement of a duct for a pilot hole of a 4" bath fan duct.

Where I can now adjust the lengths of duct pipes, I am free to make a large shift of hole location to best align with shingles. An extra hole a short distance down-roof is of no consequence.

The added crossing 2x4 that accept cap mounting screws are not in my way, and help in the strapping of the duct. Wood blocks to drywall ensure worker force upon ducts does not threaten the friction-only elbow coupling to the penetration adapter,

The topside completion photo for this job is the third graphic in this post. With no constraints of underside arrangement, 1/2" plywood only, The Norwesco RCV4 roof cap top edge was tucked under a shingle course.
Here, accepting a pilot hole centered between skip sheathing boards, the tuck under a shingle course did not work out. Remember, the roof cap is only a direct-rain cover, in combination with the roof penetration adapter.

In the photo above, see steel/ EPDM washers cannibalized from inappropriate roofing screws. I shall never need more than 1x backing under plywood roof sheathing. Use 1 5/8" deck screws with independently-purchased 1/2" OD steel/ EPDM washers. Choose washers Made In USA, Aztec Washer Co., Poway, CA. And, know this choice is offered through chance, not through manufacturer and re-seller diligence. Read on, below.

Wanting only the washers, I first purchased qty 100 of a too-small 3/8" OD washer from Raw Products, via Amazon.
Neoprene EPDM Washers 18/8 SS - #8 (OD .50) Qty-100
$10.74 | Qty : 1 | Sold by Raw Products Corp
$10.74 wasted. What next? I'm lucky to live in metro-Portland, Oregon, large-enough to support quite a few fastener store-fronts. At Oregon Bolt, Inc., persisting by phone I found admission they had qty 300 of 1/2" washers like those on also-sold 2" roofing screws. I bought qty 100 of washers maybe a bit thin, identified as 15BW050STL, 8 X 1/2 BONDED SEALER WASHER AZTEC H.
I can not select this washer at the Aztec web site . I will hope that anyone may find 1/2" gasketed washers, somehow.
Here are two more variants of 4" bath fan roof cap placement, allowed with penetration adapters. Cap placement must cope with existing or new holes, independent of shingle patterns.


Now record the Famco BK6BK cap installation on this roof, for exhaust of a kitchen microwave oven, in place of an unsuitable static vent. Here is the static vent, with poor proximity to a plumbing vent.

I must employ this roof cut, placing the Famco cap as far as possible from the plumbing vent.

Here is trial placement of the flappered 6" roof penetration adapter.

The better roof opening is quite long, requiring several "shingle bridges" above and below the penetration adapter. Add plywood strips below the roof sheathing to strongly engage 1 5/8" deck screws that retain the roof cap.

Here is the topside completion of the modified Famco cap.

Here is the efficient and secure 6" duct, installed in a now nicely accessible attic.

Here is the actual cap arrangement employing three shingle bridges, and the flappered penetration adapter. The elongated opening could have been mended using a one-piece cap, but there is more-assured mending of found shingle hacks and excess opening of the roof sheathing, before the cap is placed. In a new installation shingle and roof cuts are smallest-possible and are simple circles perhaps cut with a hole saw. In a re-roof the penetration adapter is more-easily laced among shingles, with unambiguous trimming needs, then the rain cover/ roof cap with no trimming of shingles, all with accuracy.


Here I began the 14 1/2" sheathing cut with swing of deck screws to cut shingles about a center pivot. The silly fan manufacturer prescribes an 18" square opening of the roof sheathing. I protest:


Roofers are accustomed to high-vent caps that simply slide down from the roof for cap or shingle maintenance, with removal of a few gasketed screws. A proper ducted path must have full penetration of the roof sheathing. Compliance in this is often forced by use of a cap with a stem. It is increasingly hard to find offered duct caps without stems. A diligent fan installer will tape and/ or screw the fan-duct termination to the stem. If a cap must always be detachable, we need to introduce duct penetration adapters. Let there be no offering of caps with stems.
I want these things in the roof cap of a bath or kitchen exhaust duct:
I will now detail innovation in which all of these wishes are achieved. Readers should appreciate this for the fact that these wishes are not always achieved, especially those of Items 1, 2,3, 6, 7 and 8.
Suggestions and background here are based on lifetime commitment of always to do better in each new installation, and are abbreviated from a photo album summary more-instructional to manufacturers I wish to influence. Where I offer invention, I intend always to prove existing practice and to fully disclose details, to ensure free availability to all, not allowing a competing patent.
Imagine a better way to cap a bath or kitchen exhaust duct at the roof, with a flow-check flapper upon an intermediate “penetration adapter.” The penetration adapter seals against water flow down the roof, superior to a one-piece cap. The adapter demands less release and reset of surrounding shingles. The cap, a powered fan or any other roof device needing roof penetration, serves only as a rain cover of the smallest-possible, neat hole cut through roof sheathing.

Shown is a 6” Famco roof cap, BK6BK. With an 8" dia. circular nibbling of the base plate, I have discarded the factory center, a 2" length of 6" pipe crimped into the plate, sealed imperfectly with a bead of caulk. My spun-aluminum penetration adapter has same 6” ID, now bearing the Famco cap's flapper and silencing seat.
The common injection-molded plastic 4" bath fan cap of manufacturer Air Vent is now produced by many regional injection molders, branded Gibraltar presently in sales at Home Depot, and only with stem. Famco offers the cap with a detachable stem. I would install the Famco cap thus, with reliance on the duct penetration adapter to deflect water accumulated on the roof.

At $24.95 plus shipping, this cap is awfully expensive compared to $11.00 paid steadily over many years for caps labeled Air Vent Inc., 4" RCV, made at Portland Oregon molder M&N Plastics and sold by Beacon Building Products. At this time, only Famco offers a plastic cap useful to me. I can buy a Broan 634 4" steel cap without stem for about $40, a price that has not changed in eight years.
- There is no compromise of two layers of sealing against roof leakage in water down-flow from the roof.
- There is no possibility of siphon action, with leakage from water flow driven upward on the roof.
- There is back-draft protection at the roof, that can not mechanically jam.This is also effective protection that small pests do not find refuge in ducts below. Design of the back-draft protection shall ensure materials don't degrade , free of service needs for minimum 25 years. Jamming open with excessive grease carry in kitchen exhaust shall be warned-against, including provision of easy from-roof maintenance procedures.
- Screening of maximum 1/4" mesh keeps out larger pests.
- The cuts through roof sheathing and shingles must be of minimum size matched to that of a served duct.
- Positive means shall assure that a cap is not misaligned with roof cuts and served ducting in a way that compromises flow capacity, structural integrity and safety of the roof, and water-tight integrity.
- The cap screen, body interior, and the back-draft protection shall be easily serviceable from the roof, without compromise of watertight integrity.
- A cap must be detachable from the roof without need of attic access. This is already true of vents not served by approaching ducts.
I will now detail innovation in which all of these wishes are achieved. Readers should appreciate this for the fact that these wishes are not always achieved, especially those of Items 1, 2,3, 6, 7 and 8.
Suggestions and background here are based on lifetime commitment of always to do better in each new installation, and are abbreviated from a photo album summary more-instructional to manufacturers I wish to influence. Where I offer invention, I intend always to prove existing practice and to fully disclose details, to ensure free availability to all, not allowing a competing patent.
Imagine a better way to cap a bath or kitchen exhaust duct at the roof, with a flow-check flapper upon an intermediate “penetration adapter.” The penetration adapter seals against water flow down the roof, superior to a one-piece cap. The adapter demands less release and reset of surrounding shingles. The cap, a powered fan or any other roof device needing roof penetration, serves only as a rain cover of the smallest-possible, neat hole cut through roof sheathing.

Shown is a 6” Famco roof cap, BK6BK. With an 8" dia. circular nibbling of the base plate, I have discarded the factory center, a 2" length of 6" pipe crimped into the plate, sealed imperfectly with a bead of caulk. My spun-aluminum penetration adapter has same 6” ID, now bearing the Famco cap's flapper and silencing seat.
The common injection-molded plastic 4" bath fan cap of manufacturer Air Vent is now produced by many regional injection molders, branded Gibraltar presently in sales at Home Depot, and only with stem. Famco offers the cap with a detachable stem. I would install the Famco cap thus, with reliance on the duct penetration adapter to deflect water accumulated on the roof.

At $24.95 plus shipping, this cap is awfully expensive compared to $11.00 paid steadily over many years for caps labeled Air Vent Inc., 4" RCV, made at Portland Oregon molder M&N Plastics and sold by Beacon Building Products. At this time, only Famco offers a plastic cap useful to me. I can buy a Broan 634 4" steel cap without stem for about $40, a price that has not changed in eight years.


Please visualize topside completion with this Summer 2016 photo for a 4" bath fan duct, with an injection-molded cap.

Here is an underside view of that cap, Norwesco RCV4 . One should wish for tolerance of some misalignment between the cap center and the smallest-possible roof cut, but an oversize square below a flapper-check here is not as helpful as size of the cap might permit. I suggest there should be about 2" diametral clearance between pipe and cap paths in which there is no performance penalty, in placing the cap to suit the shingle pattern.

Where the cap bore is about 3/4" above the roof bore in this installation, I think there is some added flow resistance.

Where Norwesco and Famco 4" and 6" plastic caps without stem are nearly identical and with a lot of misalignment potential, find argument that their flapper function should be transferred to a roof penetration assembly. Enlarge the crown and the opening of the base of their caps as in steel Broan 636 (up to 4" ducts) and 634 (up to 6" ducts), and their cheaper knock-offs at Home Depot. With this innovation, offer convenient duct joining means for the Broan steel caps. Get rid of jamming-prone rectangular flappers.
See here better trial placement of a duct for a pilot hole of a 4" bath fan duct.


The added crossing 2x4 that accept cap mounting screws are not in my way, and help in the strapping of the duct. Wood blocks to drywall ensure worker force upon ducts does not threaten the friction-only elbow coupling to the penetration adapter,

The topside completion photo for this job is the third graphic in this post. With no constraints of underside arrangement, 1/2" plywood only, The Norwesco RCV4 roof cap top edge was tucked under a shingle course.
Here, accepting a pilot hole centered between skip sheathing boards, the tuck under a shingle course did not work out. Remember, the roof cap is only a direct-rain cover, in combination with the roof penetration adapter.

In the photo above, see steel/ EPDM washers cannibalized from inappropriate roofing screws. I shall never need more than 1x backing under plywood roof sheathing. Use 1 5/8" deck screws with independently-purchased 1/2" OD steel/ EPDM washers. Choose washers Made In USA, Aztec Washer Co., Poway, CA. And, know this choice is offered through chance, not through manufacturer and re-seller diligence. Read on, below.
Wanting only the washers, I first purchased qty 100 of a too-small 3/8" OD washer from Raw Products, via Amazon.
Neoprene EPDM Washers 18/8 SS - #8 (OD .50) Qty-100
$10.74 | Qty : 1 | Sold by Raw Products Corp
$10.74 wasted. What next? I'm lucky to live in metro-Portland, Oregon, large-enough to support quite a few fastener store-fronts. At Oregon Bolt, Inc., persisting by phone I found admission they had qty 300 of 1/2" washers like those on also-sold 2" roofing screws. I bought qty 100 of washers maybe a bit thin, identified as 15BW050STL, 8 X 1/2 BONDED SEALER WASHER AZTEC H.
I can not select this washer at the Aztec web site . I will hope that anyone may find 1/2" gasketed washers, somehow.
Here are two more variants of 4" bath fan roof cap placement, allowed with penetration adapters. Cap placement must cope with existing or new holes, independent of shingle patterns.


Now record the Famco BK6BK cap installation on this roof, for exhaust of a kitchen microwave oven, in place of an unsuitable static vent. Here is the static vent, with poor proximity to a plumbing vent.


Here is trial placement of the flappered 6" roof penetration adapter.

The better roof opening is quite long, requiring several "shingle bridges" above and below the penetration adapter. Add plywood strips below the roof sheathing to strongly engage 1 5/8" deck screws that retain the roof cap.

Here is the topside completion of the modified Famco cap.

Here is the efficient and secure 6" duct, installed in a now nicely accessible attic.

Here is the actual cap arrangement employing three shingle bridges, and the flappered penetration adapter. The elongated opening could have been mended using a one-piece cap, but there is more-assured mending of found shingle hacks and excess opening of the roof sheathing, before the cap is placed. In a new installation shingle and roof cuts are smallest-possible and are simple circles perhaps cut with a hole saw. In a re-roof the penetration adapter is more-easily laced among shingles, with unambiguous trimming needs, then the rain cover/ roof cap with no trimming of shingles, all with accuracy.


Here, a 4" bath fan duct is rigidly fixed to the roof with sheet metal screws. Added 2x4 bridging accepts roof cap mounting screws, and compensates for lost plywood stiffness with the 4 1/8" dia. sheathing cut.
See an edge of the not-stiff 15/32" sheathing plywood, 4" below the lower support here. Walking upon a displaced plywood edge may rip roofing membrane.
Here is an installed 14" Costco solar attic fan, employing a penetration adapter and very-much-needed 2x4 sheathing reinforcements. There is no ducting to this fan, but a penetration adapter is yet a good idea. The fan as a rain cover is easily detached from the roof, at four mounting screws, leaving a rimmed hole that might be bagged against rain for fan service.


Slow Progress In Solar-Powered Attic Ventilation January 29, 2014
And at January 2025 edit here, still find no progress.
Use roof sheathing reinforcements generously.

Find that a penetration roof cap can be useful in curing the common occurrence of a misplaced attic ventilation high vent. No duct. This intermittent leak with a wind-driven siphon, in my home, was repaired in November 2011, by an understanding and highly reputable roofer under my instruction.


See the repair at 1/10/2025, never again leaking.:
Here is another important use of a penetration adapter, in passive control of dangerous radon levels in my rental home:

Here is the suck of the perforated pipe in the gravel channel, sealed under ground covering. The female side of a spun-aluminum 4” roof penetration piece joins the buried pipe as male. Double-backed butyl tape durably and sealingly bonds the adapter to the ground cover. The male end of a two-ft warm air pipe sealingly engages the penetration adapter.

Here is the gravel channel and pipe fitting, before gravel-filling and sealing of the ground cover:
No comments:
Post a Comment