Translate

Showing posts with label Lights Wiring Innovation. Show all posts

Saturday, January 19, 2019

18 ga Home Run Wiring Of LED Lights With A Central Distribution Panel


I present the above study to justify use of 18 AWG wires as home run from each low-power luminaire, to a central distribution control panel. 18 AWG may carry up to 16 amps, compared to actual 1 amp with luminaires 15 watts and less. 15 watts divided by 12 volts minimum (DC), is about one amp. Home run wiring, none powering more than one luminaire, offers advantage of smaller, more-flexible, less expensive wires, and freedom to place any light in a constellation  of lights operated together from a switch (single pole), or from a  switch set (3-way and 4-way switching). See that current carried will be acceptable with home-runs, even with tiny 24 ga ethernet wires from a luminaire as in Power Over Ethernet (POE) lighting. 22 ga leadwires of short length immediately connected to a luminaire may serve tiny connectors as assembled easily by children in robotics projects. We should hereafter see little need of 14 ga romex, the past usual call in residential lights wiring.

Where 18 ga wire in low demand is in fact more expensive than so-common 14 ga, wish for cure in a shift of demand. Wish for a lighting future where lights wiring permits DC distribution at the a distribution panel or at several terminal-strip hubs where AC conversion is peculiar to a family of DC lights.

This post is continuing discussion of refined kitchen and outdoor LED lighting in my own home. My Kitchen LED Starry Sky With Constellations .


Protected and out of sight in the attic, the lights wiring is little improved from this photo of September. 2018. Please come to accept that evolving low power,LED and OLED lighting (10 watts typical to each luminaire)  will employ a mix of wire sizes 14 ga and smaller, and will allow central conversion from AC house power or direct delivery of photovoltaic output, to luminaires and to other DC loads.

In fact, I have so far exercised only low power wiring, where 18 ga wires are placed. The home run 18 ga wires are collected at terminal blocks with push-in of bared single strand copper wire ends. The blocks are built by Phoenix Contact .and were found at Portland, Oregon store URS Electronics .


Terminal blocks first tried are configured for adhesive mounting, Phoenix ID 3273352 .
$4.63 each.


Where adhesive mounting was not secure. I have transferred mounting to DIN Rail Adapters, Phoenix ID 3274054 
$0.80 each.


Employ an 8" length of DIN Rail.


And, now think of better choices available.


Terminal blocks configured for direct mounting to DIN rails will have better orientation, parallel to a rail
This is Phoenix ID 3273220 .

$4.79 each.


This is a large stack of three-level DIN rail terminal blocks, 
Phoenix ID 3210499 .
$6.69 each.


This is a large stack of two-level DIN rail terminal blocks,
Phoenix ID 3002615 .
$11.51 each.


With a three-level block for each set of lights served by a jacketed home run may be labeled upon its sleeve, with power, neutral and ground leads of short length extending from sleeve. Where wiring might someday be low voltage, persist in avoiding use of ground wires. then using two-level terminal blocks.


Watch a Phoenix Connect innovations video.

Highlights 2018 . The topics are electronics/ digital connections that already are possible. 

Let us imagine details of our better lighting future, to be offered from many suppliers and installation innovators.
Let us imagine lighting as involving many electronics suppliers like my Oregon store URS Electronics , and fewer old-bulb-selling hardware stores.


Here is my attic arrangement of kitchen lights wiring, slightly improved with DIN Rail Adapters.


Here is an assembly of two-level terminal blocks Phoenix 3044636 with plug-in bridges, three-position Phoenix 3030174 and four-position, Phoenix 3030187. Trial mounting is upon  a new 8" length of DIN rail with two rail accessories set  that I may not use, Phoenix E/NS35N Rail End Clamp, and Phoenix 1206560 Cut Rail End Cap.

Bridges at lower level establish common switched output to two 5-luminaire constellations, one 6-luminaire constellation and two home runs from outdoor lights on one switch. Bridges at upper level common all neutral wires.

Why consider the Rail End Clamp? Let it wedge an insulating cover of otherwise exposed power conductors. The two-level terminal blocks have strong fit as a cluster, and do not need further restraint.


A coil of 0.511" Corrugated Split Loom Tubing is at the ready for neat confinement of 18 ga and 14 ga cables leading to the cluster.


Where luminaire leads must approach both sides of the DIN rail here. place the rail upon stand-offs so that leads may pass under.


Here see Phoenix 3044636 Two level Terminal Block, Phoenix 3214259 ($2.50 each), Three Level Terminal Block ($4.50 each), E/NS35N DIN Rail End Clamp, and Phoenix 1206560 Cut Rail End Cap. These parts are offered only in Color Gray. See that conducting metal is exposed at one end of a block cluster, and that the end clamp tried can not cover the adjacent conductors. I imagine there are available end caps for the two-level and 3-level terminal blocks. End caps will never be needed at both ends of a cluster; the covering must be the purpose.


The three-level block would be useful where conductors carried to luminaires include ground wires. I have ground wires in my luminaire 18 ga cables, not connected at luminaires. Someone will say that I should attach the ground wires, where they carry 110 vac.

Friday, November 23, 2018

My Kitchen LED Starry Sky With Constellations

I offer a mechanical engineer and general contractor view of the evolution of imagined and commercially-offered residential LED downlighting, as seen from USA. The journey began in September 2011 with discovery of T91 in Home Depot stores. Sharing in this blog is most broadly with posts filtered by label LED Downlighting . 

From the beginning, my observation of possibilities has been with notion of LED overhead lighting as a starry sky . Pick that link for word search of this blog, and step back to some of the early history. I hope that in reading this post, you will come to share the starry sky notion, though it is not confirmed as publicly-accepted in a general search of LED downlighting as starry skies


I am privileged to have freedom to imagine and invent in my own home, and that invention is the subject of numerous posts, this blog, Label: My House .

Please see this Google Photos album as my contribution to lighting state of the art, in Fall-2018:

My Kitchen Lighting 


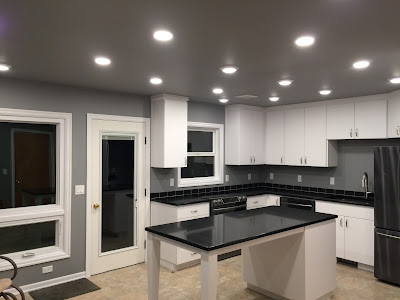
Here is one of the photos, 9/27/2018, sun rising as Dr. Christine Blasey Ford testifies in Congress, we listening with hope, myself cheered by my better new surroundings, in dimmed minimal lighting

Appreciate the virtue of the new half-bath. To the right of the bathroom plywood gray-painted wall, see a useful pantry cabinet, separated from the bathroom by a cabinet 6" wide, housing a sturdy stepladder and an ironing board. I offer new ideas to cabinet-makers and kitchen planners, as well as to lighting shoppers.


Here is my as-built lighting plan, with named lighting constellations.


Lights employed are:
6" Glimpse Second Generation 750 lumens, 3000°K (1 place)
6" Glimpse Third Generation (2016) 850 lumens, 3000°K (2 places)
Nicor DLS 10  830 lumens, 3000°K (7 places)
Commercial Electric 74203 500 lumens, SW switch position ~2900°K  (6 places)
6" GetInLight, First Generation 900 lumens, 3000°K (1 place)

Total: 12,160 lumens.

Of these, all are discontinued except CE 74203. The original 6" GetInLight in the bathroom is prettier and superior to an "improved" version now offered at Amazon marked "2nd Generation" on the package.

My kitchen is a lighting museum documented in my blog posts and photo albums. Who else has followed the evolution, and the disappointments of marketing failure? Where else will you see those discontinued pretty, useful lights of modest glare, superior to slim pickings in what can be found today?

The linked photo album includes photos of the achieved lighting, including the illustration of light groupings as constellations. In this, see that constellation make-up should consist of variety in size.

Here is mode Living.


Here is mode Cooking.


Here is mode Dining:


Here see all lights, about 500 Lux. This is only useful light. It is easy to live under. Of best efficiency. Not glaring. See good angled ilumination of countertops without resort to difficult under-cabinet wiring. Angled lighting matters. There is always loss of luminaire efficiency where recessed in the luminaire or confined within a can. This photo accurately depicts what you would experience standing in the kitchen. You see mainly from eye level and downward, as we and all creatures are conditioned, living under the Sun. It is important that luminaires have ample diode and lens area to avoid glare. Please read more about glare, in this blog. Search Label: Luminance Definitions . Government officials: beginning with US Department of Commerce, require that packaging labels include competitive statements of diode luminance and lens luminance.


Include here some practical details of the selection and installation of luminaires.


With a mock-up, imagine ceiling cuts 3" diameter for the brackets and luminaire mounting of CE 74203 LED disk edge lights. I wished to find lights that demanded only minimal ceiling cuts, to pass wires. The newly-found lights from Lowe's would absolutely require 4" cuts.

In fact I needed to do one installation very much like this. A 1x4 bridge of drywall edges interfered with cut-in of a junction box. Cut a 3" hole in the drywall, on the hole center, before cutting a 2 1/4" thru-hole in the 1x4.


Now, is there really anything to be saved by making a smaller hole, if a sizable hole can't be avoided?  I have developed the method with 3" holes, but it is simpler and more versatile to just cut in RACO 175 boxes now, as done here for light Position m


I dislike need to constrain lighting patterns for junction box clearance of the ceiling/ attic floor framing. I just could not find wished 4", 500 lumens LED disk lights that could be surface mounted anywhere, with only small holes for wires. I did manage installations of Nicor DLS10 in circuit Cooking. Here is a photo of this:


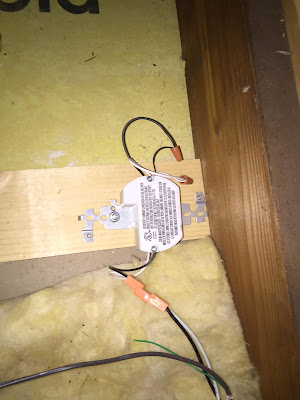
A Nicor DLS10 LED disk light is screwed to the ceiling below this 1x4 that bridges a drywall edge. A 1/4" hole through drywall and the 1x4 passes the luminaire DC power leads. Screw-attach the converter block in the attic, and complete AC wiring connection via 18 ga 3-wire leads to the lighting distribution panel.

Three lights at room center over the kitchen island are wired in this way.


Here is my attic completion of lights wiring, Box 2 in the diagram above, and some very efficient terminal strips. One terminal strip each for circuits 1. 2 and 3, and a fourth strip for neutral wires. My home-run leads of AC power to luminaire positions is 18 ga. I hope to demonstrate that 11 watt luminaires should no longer be fed with 14 ga romex leads. The home runs sometimes miss opportunity of daisy chains, but bring flexibility of switched light groups, and are more error-free. I have no progress toward wiring of lights as DC, but think I bring fresh experience to a methods table. I will pretty up all of this wiring before moving on to other work outside my home. 

I have mixed feelings about not carrying ground wires to the luminaires. The green wires here serve no purpose, and I think 2-wire 18 ga wiring Black/White, is better. Manufacturers do not understand the need of luminaire grounding, often making installations more difficult and unreliable. Can we just eliminate ground wires?


Pursue that decision to leave green wires not-connected. Here are the full contents of the Commercial Electric 74203 package. See a screw and a green wire in the bag. 


Here are the installation instructions, the two sides of one piece of paper.


Intentions for the green wire and screw are evident in Instructions Step 3 at top of Instructions second page.


It is intended that ground from the circuit breaker panel be applied to the luminaire mount ring. What does this achieve? Just that if a bared power lead touches the ring, there will be trouble.

I think a principal purpose of a luminaire ground wire is to serve as an installation tether, and that is not done here.

Bare copper wires connected to ground present real danger in needless proximity to AC line voltage. Ground connections to line-voltage devices in junction boxes should thus be with insulated green wire. Ground wires in line voltage cables should more-commonly be insulated. Ground wires in low-voltage cables should not be not required if serving no purpose.