My plumbing suppler assures that tub design is for placement directly against wall studs. Butt-placed drywall is set against the 1/2" thickness raised edge perhaps 1/2" tall. Not so, I say. I offer my argument with some new illustrations.


The airy space under the tiles bottom edge stays clean and in shadow has the appearance of the tile grout. The wall stays dry and healthy. No ugliness, ever!


Absent the copper and epoxy, with sure-to-fail ugly staining caulk, water would wick past the tub rim.

The airy space under the tiles bottom edge stays clean and in shadow has the appearance of the tile grout. The wall stays dry and healthy. No ugliness, ever!
Outside walls should be insulated and hard-covered before a bathtub or shower unit is placed. Here is a reverse-chronology abbreviated photo album of my trial of methods, where I demand hard backing for wall tile.
Here are all photos split into three groups:
I really, really want feedback for my effort in the job and in this post.
I use two layers of 1/4" backer board, for reasons including secure tile overlap of a copper seal edge.
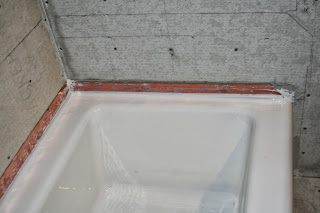 I will not rely on tile or caulk in sealing the tub edge. Here two-part epoxy seals a copper edge to the tub lip and exposed areas of the backer board.
After several trials, I chose a Kohler porcelain tub of ordinary height, with sharpest inside corners. I believe least maintenance and best suitability if handicapped, is with a tub this height, with good shower curtains, not glass doors.
See the pencil tracings on backer board above? Yes, my plumbing supplier took in exchange, an undamaged too-tall fiberglass Maax Skyline tub. I thought the Maax tub flanges would be conducive to edge sealing, but they are not. I find no tub built to not rely on caulk. The copper idea was volunteered by friend Copper By Design. I inquired about stainless steel.
 Tiling was done atop ultra-flat 3/8" ACX plywood framed below as a strong and flat table. Bottom tiles will rest on the plywood, and that tile rest edge will remain exposed out of sight, sanitary with full gap filling of flexible grout. Flexible grout has added mildicide. I offer free samples and seek to inspire manufactur

My material, in other applications, has advantage in being sandable-like-drywall-mud. I appeal to Custom, to offer that product.

The finished bathroom outside wall.
 The tile is backed with plywood set in the walls, and two layers of 1/4" backer board. Many screws ensure tiles and grout should never be distressed by any action in the wall. Thermal stability with the insulation will help too.
The plywood is 3/4" thickness and should have extended to the ceiling, for secure mounting of the outer layer of 1/4" backer board even where there are no tiles. This plywood is moderately-well fastened. It may not adequately support grab bar attachment points. I might have toed many more screws to lock plywood to the joists. I could have taken more space, facing 3/4" plywood sheets against the wall joists, for mounting of whatever, anywhere. Think and do not fail to learn. More-ideally, plan grab bar attachment points of solidly-mounted 2x lumber.
I use two layers of 1/4" backer board, for reasons including secure tile overlap of a copper seal edge.

After several trials, I chose a Kohler porcelain tub of ordinary height, with sharpest inside corners. I believe least maintenance and best suitability if handicapped, is with a tub this height, with good shower curtains, not glass doors.
See the pencil tracings on backer board above? Yes, my plumbing supplier took in exchange, an undamaged too-tall fiberglass Maax Skyline tub. I thought the Maax tub flanges would be conducive to edge sealing, but they are not. I find no tub built to not rely on caulk. The copper idea was volunteered by friend Copper By Design. I inquired about stainless steel.


My material, in other applications, has advantage in being sandable-like-drywall-mud. I appeal to Custom, to offer that product.


The plywood is 3/4" thickness and should have extended to the ceiling, for secure mounting of the outer layer of 1/4" backer board even where there are no tiles. This plywood is moderately-well fastened. It may not adequately support grab bar attachment points. I might have toed many more screws to lock plywood to the joists. I could have taken more space, facing 3/4" plywood sheets against the wall joists, for mounting of whatever, anywhere. Think and do not fail to learn. More-ideally, plan grab bar attachment points of solidly-mounted 2x lumber.